
Applications
Le flux commence dès l’admission de l’étudiant à l’institut. Pour commencer, OpenEduCat fournit la fonctionnalité d’une inscription.
You can go to the . Click on
Newbutton to give admission to particular student.

Details of Registration Form
Photo :- Upload a passport size photo of the student from the image widget on the top left corner.
Title :- Provide appropriate title for the student from the list provided in Title field.
Name :- You can provide the name of the student in terms of First name, Middle name and Last name in the name fields.
Pages in the Registration Form
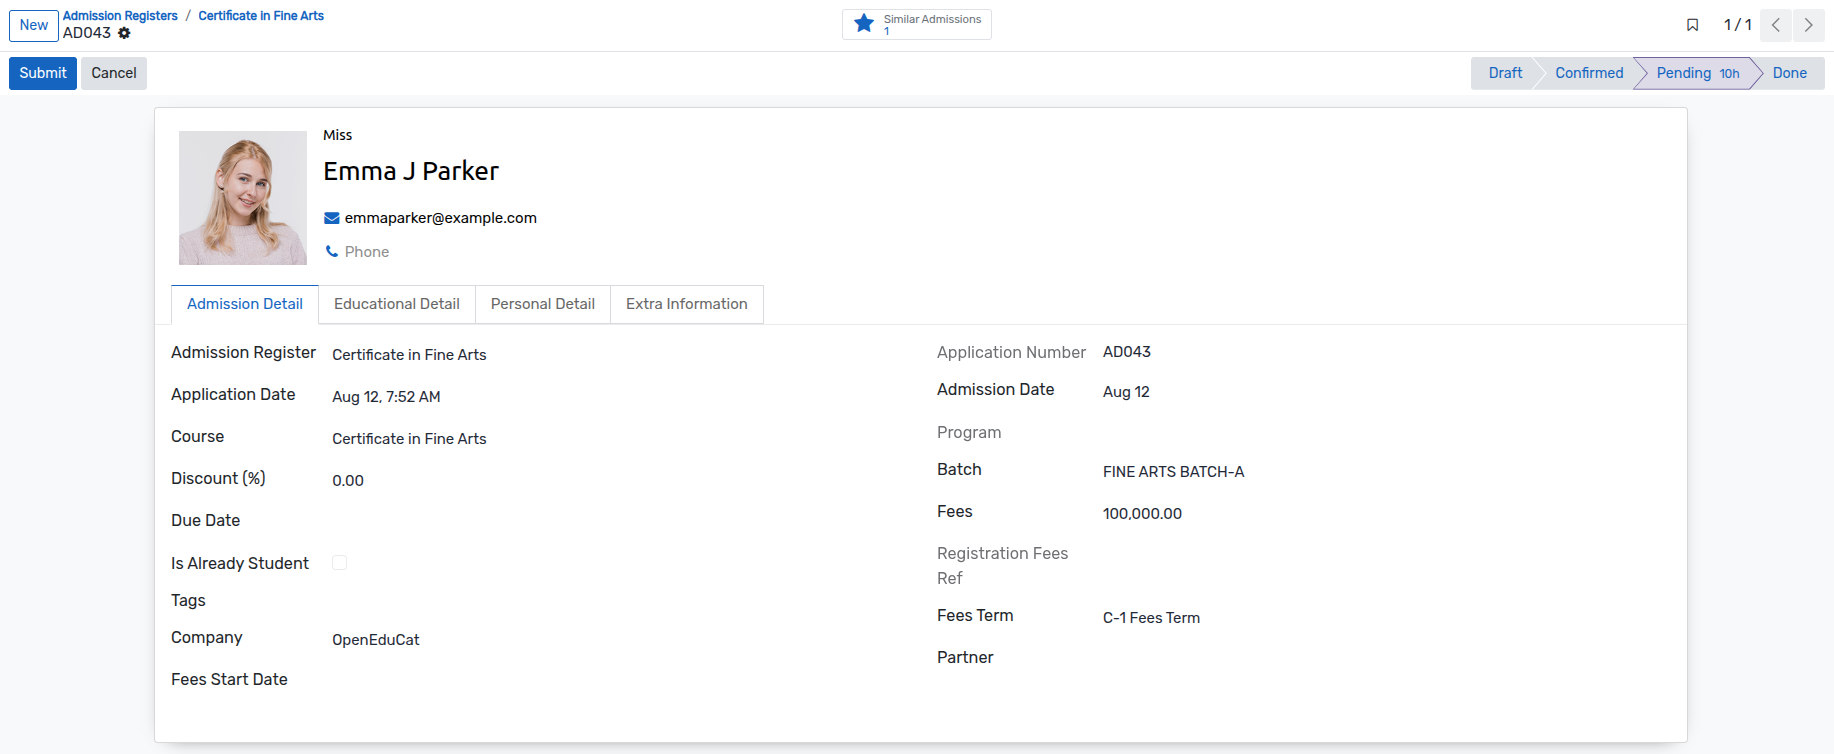
Détails d’admission
Admission Register :- Each admission falls in a Admission Register which basically consist of the Course(Course for which the admission is created).
Application Number :- Application Number is a unique number generated by OpenEduCat to uniquely identify the admission record. It is generated by default by OpenEduCat.
Application Date :- Application Date is the date on which this application is created. Date and time is fetched by default from the system by OpenEduCat.
Admission Date :- Admission Date is on which date the admission of the student is confirmed. It is set by OpenEduCat automatically as per the system date. You can change it later on.
Course :- Specify the name of the course in which the student has taken the admission from the list provided in Course field. You can create a new course from here too.
Program :- Program in which the student has taken the admission.
Batch :- Batch is the year span (For example, batch from 2012-2015) in the student is enrolling for particular course.
Discount :- Set Discount for particular admission.
Fees :- Fees field fetches the price from product field in admission register or you can specify different price here.
Due Date :- Due date is the last date of the fees to be paid up for confirming the enrollment.
Fees Term :- Fees term used for the registration. The value is set automatically from the fees term of the selected course, or from the Course Plan when an academic plan is used, so the field is displayed as read-only.
Partner :- Select partner of the Student.
Tags :- Add one or more tags to classify the application, for example
Scholarship,Hostel RequiredorDocuments Pending. Tags are colour coded and are also displayed on the Kanban card of the application, which makes it easy to spot applications that need a particular follow up. Tags are created from .Is Already Student :- Checkbox indicating that the applicant is already registered as a student in the institute.
Fees Start Date :- The date from which the fees terms of the applicant are calculated.
Note
Batch fournit la liste uniquement des lots mentionnés sous le cours, sélectionné dans le champ Cours.
Academic Plan Fields
When the Academic Plan feature is enabled in , two additional fields become available on the Admission Detail page. The configuration of the academic plans themselves is described in the Academic Plan Management documentation.

Academic Plan :- Select the approved academic plan of the applicant. Only the academic plans that contain the selected course and that are already approved can be selected. The field is mandatory for users who work with academic plans.
Intake Year :- Select the intake year of the applicant.
Note
When an Academic Plan is selected, the Fees Term and the Fees of the application are fetched automatically from the Course Plan of that academic plan (see the Fees Term field of the Course Configuration in the Academic Plan documentation).
The Program is filled in automatically from the selected course and is displayed as read-only.
Both the Academic Plan and the Intake Year are copied to the student record when the application is enrolled.
Similar Admissions
While an application is open, the Similar Admissions smart button at the top of the form shows how many other applications share the same email address or the same phone number. This helps to detect duplicate applications, or to see that an applicant has applied for more than one course.
Click on the
Similar Admissionssmart button to open the matching applications. They are opened in read-only mode, so no new application can be created from that screen.

Sending an Email to the Applicant
OpenEduCat ships with ready made email templates so that the admission office can answer an applicant directly from the application.
Open the list view and click the
Emailbutton on the line of the applicant. The button is hidden once the application is enrolled (Done).

The Send Email composer opens with the Admission Confirmation template already loaded, with the recipient, the subject (which contains the application number) and the body pre-filled.
Review or edit the message and click on
Send.

Note
The same composer is available from the application form through the
Send Emailentry of the gear (⚙) action menu.Two templates are delivered with the application :- Admission Confirmation Template and Admission Reject Template. Click on the template button (⋮) at the bottom of the composer to switch from one template to the other. The templates can be personalised from .
Détail éducatif
Les informations sur le cours précédent, l’institut et le score obtenu dans ce cours peuvent être mentionnées sous cette page.
Previous Institute :- Previous Institute can be selected from the list of names of organization from where student has pursued his last educational degree.
Previous Course :- Previous Course can be selected from the list of available course that student has completed successfully.
Previous Result :- You can provide the result of student’s latest degree in terms of percentage in Previous Result field.

Détail personnel
Pour préciser les coordonnées personnelles de l’étudiant, ouvrez cet onglet.
Gender :- Specify the Gender of Student.
Email :- Specify the email of Student.
Phone :- Specify the phone number of Student.
Mobile :- Specify the mobile number of Student.
Birth Date :- Specify the Date of Birth of Student.
Address :- Specify the contact details of the applicant in here with details like street, city, state, zip code, country.
Family Business :- You can specify family business in this field.
Family Income :- You can specify family income in this field.
