
Placements
Configuration
Coordination Teams
OpenEduCat offers a comprehensive feature to manage dedicated placement coordination teams that operate year-round to support student placements based on their interests. The system allows you to record detailed information about each placement team, including the team leader and associated team members.
Go to .
Click on New to create a new Coordination Teams.

Details of Placement Team Form
Placement Cell Team :- Set the name of the Placement Cell Team.
Team Leader :- Select the leader of the placement cell team .
Team Members :- Select the team members for whom the placement cell team is created.
View Opportunities from Coordination Team
On the Coordination Teams kanban card, a View Opportunities button is available. Clicking this button opens the Job Opportunities filtered specifically for that placement team, giving quick access to all active announcements handled by the team.

Partner Companies
Go to .
Click on New to create a new Partner Companies.

Partner Company HR Details
When you open a Partner Company record, an HR Details tab is available in addition to the standard contact information. This tab stores the primary HR contact details for the company:
HR Name :- Name of the HR representative at the partner company.
HR Contact :- Phone or contact number of the HR representative.
HR Email :- Email address of the HR representative.
Additional fields are also available directly on the partner form:
Company Code :- A unique code to identify the partner company in the system.
Head Office :- Location of the company’s head office.

Recruitment Sessions
Go to .
Click on New to create a new Recruitment Sessions.

Details of Sessions Form
Name :- Enter the name of the Session.
Code :- Provide a unique code to identify the Sessions.
Start date :- Specify the start date of the Sessions.
End date :- Specify the end date of the Sessions.
Companies:- Select the companies that are participating in this Sessions.
Fee Applicable for Company :- Enable this option if companies are required to pay a fee for participating in the Sessions.
Fee Applicable for Student :- Enable this option if students are required to pay a fee to participate in the Sessions.
Opportunities:- This section allows you to view or create new opportunities associated with the selected Sessions.
Training Types

Each Recruitment Session includes a Training Types section that records the types of training activities offered to students during the session. The following training types can be enabled:
Resume Writing Workshop :- Enable if a resume writing workshop is conducted.
Mock Interviews :- Enable if mock interview sessions are scheduled.
Group Discussions :- Enable if group discussion sessions are included.
Technical Skills :- Enable if technical skill training is provided.
Personality Development :- Enable if personality development sessions are conducted.
Internship Program :- Enable if an internship program is part of the session.
Recruitment Session Workflow
A Recruitment Session follows a lifecycle managed by status buttons in the header:
Draft :- Default state when a session is created.
Click Activate to move the session to the Active state, making it available for linking to opportunities.
Click Close to mark a session as Closed once the recruitment drive is complete.
Click Set to Draft to reset a closed session back to Draft state if needed.
Note
Only active sessions appear as selectable options when creating a new Job Opportunity.
Event Templates
Configure the event template here to define default settings that can be reused when creating new events.
Go to .

Event Stages
Go to .
Configure event stages here to define the different phases an event goes through, such as Draft, Confirmed, or Done.

Event Tags
Go to .
Configure event tags here to categorize and filter events easily based on topics, themes, or other relevant labels.

Opportunities
Job Opportunities
OpenEduCat provides the feature to post the Job Opportunities of the Job Post by the placement team.
Go to .
Click on New to create a new Job Opportunities for the Job.

Details of Job Opportunities Form

Sequence :- Auto-generated unique sequence number assigned to each opportunity (read-only, set by system).
Name :- Set the name for the Job Opportunities of the Job Post.
Job Post :- Select the Job Post (only posts in “Submit” state are available).
Handled By :- Select the Placement Team who will handle this job post Job Opportunities.
Process :- Select the recruitment process type:
On-Campus
Off-Campus
Opportunity Type :- Select the type of opportunity:
Placement
Internship
Experience :- Indicate the level of experience required:
Fresher
1-2 Years
2-3 Years
3-5 Years
5+ Years
Organization :- Select the organization (company) who posted the Job Opportunity.
Required Skills :- Select the required skills for the Job post.
Sessions :- Choose the Recruitment Session (e.g., Summer 2025, Winter 2025) to categorize the opportunity. When a session is selected, the start date is auto-populated from the session’s start date, and the partner company list is filtered to the session’s partner companies.
Start Date :- Set the Start Date of the Job Post Opportunity (auto-filled from the selected session).
End Date :- Set the End Date of the Job Post Opportunity.
Written Test :- Enable this option if a written test is part of the selection process.
Group Discussion :- Enable this option if a group discussion round is included.
Description :- Set the description for the Job Post Opportunity.
Note
The fields Name, Job Post, Process, Opportunity Type, Experience, Organization, Required Skills, and Session are required. All form fields become read-only once the announcement is in Confirm or Published state.
Applications Smart Button
On a Job Opportunity form, the Applications smart button at the top shows the count of student applications submitted for this opportunity. Click it to view all related applicant records.

By clicking Confirm and Publish, the Activity Job Opportunities will be published and made visible on the website.

When the Unpublish button is clicked, the opportunity is removed from the website and will no longer be visible to visitors.

This represents the status of the opportunity, which is automatically updated when the corresponding action button is clicked.
Job Opportunity Workflow (State Lifecycle)
A Job Opportunity moves through the following states:
State |
Description |
|---|---|
Draft |
Initial state; form is fully editable. |
Confirm |
Opportunity is confirmed; fields lock. |
Published |
Visible on the website for student viewing. |
Unpublished |
Removed from the website. |
Click Confirm (from Draft) to move to the Confirmed state.
Click Publish (from Confirmed) to publish on the website.
Click Unpublish (from Published) to withdraw from the website.
Click Draft from any state to reset to Draft.
Note
State transitions are automatically logged in the Chatter with tracking of changes to fields such as partner, session, process, experience, and state.
View Modes

Job Opportunities can be viewed in the following modes accessible from the top-right view switcher:
Kanban :- Default view showing opportunity cards with Published/Confirm ribbon badges, dates, handled-by team, and a direct website design link.
List :- Tabular view showing key fields with optional columns for Active and State.
Form :- Detailed form view for creating and editing opportunities.
Pivot :- Analytical pivot table view for data analysis by date ranges.
Calendar :- Calendar view showing opportunities by their start and end dates.
Activity :- Activity scheduling view.
Search and Filters
The search bar in Job Opportunities supports:
Search by Name :- Filter opportunities by name.
Archived filter :- Show archived (inactive) opportunities.
Favorites filter :- Show opportunities marked as favorite.
Company search panel :- Filter opportunities by partner company using the left panel.
The Favorite (star) toggle is available on each Kanban card to mark important opportunities.
Application Process
An opportunity must be published first for it to be visible on the website.

These created activity announcements are displayed under Placements menu on the website. Any student can apply for the any activity announcement by logging into their account.
First student will login into their account and go the Job Placement menu.

To view the full placement information, kindly click the provided link.

Here, you can view placement details and apply for available job opportunities.

Then the student can view the details of the activity they are interested in.

Then the student can upload their documents to apply for the job and click on the Apply Now button.
Then the confirmation message will be displayed.

Website Placement Portal
The website placement portal (accessible at /placement or through the Placements website menu) includes:
A search bar to search for opportunities by job post name.
Opportunities are displayed as collapsible cards grouped by activity name.
Each card shows the job position, city/location, and start date.
Clicking a card title navigates to the full activity detail page showing Company Details, Placement Details (session, opportunity type, dates), required skills, the selection process (Written Test / Group Discussion), and a Job Description.
Clicking a specific job post within an activity allows the student to apply directly for that position.
Student Applications
Go to .
Student applications are accessible under the Student Applications menu, where all submitted records can be reviewed and managed efficiently.
Click the Documents Smart button at the top to access the uploaded documents.

Scoring System

Once a student application progresses through the recruitment stages, scoring fields become available to record the evaluation results. These fields appear based on the application’s current pipeline stage:
Written Test Score :- Score from the written test (visible from the First Interview stage onward; editable only at First Interview stage).
Interview Score :- Score from the interview (visible from the First Interview stage onward; editable only at First Interview stage).
Group Discussion Score :- Score from the group discussion round (visible from the Second Interview stage onward).
Final Score :- Automatically computed average of the three scores above:
(Written + Interview + GD) / 3.
Additional Information Tab

Each student application has an Additional Information tab containing:
Cover Letter :- The applicant’s cover letter text (read-only once the application reaches the Contract Signed stage).
Notes :- Internal notes about the applicant (read-only once the application reaches the Contract Signed stage).
The application form also shows a Job Opportunity field linking the applicant to the specific activity announcement they applied through (visible in both list and form views).
Send Offer Workflow
When a student application reaches the Second Interview stage, a Send Offer button appears in the header (provided the offer has not already been sent).
Clicking on Send Offer opens the Student Offer wizard, where offer details can be entered.
Upon confirmation, the student offer is created and an automatic email notification is sent to the student.

Details of the Send Offer Wizard
The wizard pre-fills several fields automatically:
Applicant :- The applicant record (read-only, auto-filled).
Student :- The student’s partner name (read-only, auto-filled from applicant).
Partner Company :- The company linked to the opportunity (read-only, auto-filled from the activity).
Joining Date :- The proposed date for the student to join (editable, defaults to today).
Training Period :- Duration of the training/probation period (numeric value + unit).
Training Period Unit :- Select Month or Year for the training period duration.
Offer Package :- The monetary compensation package offered to the student.
Clicking Confirm in the wizard will:
Update the applicant record with the offer details (joining date, package, training period).
Move the applicant to the Contract Proposal stage.
Send an automated Student Offer Notification email to the student with full offer details (company name, joining date, offered package, training period).
Create a corresponding Placement Offer record automatically.
Placement Offer
Go to .
Click on New to create a new Placement Offer for Student.

Details of Placement Offer Form
Name :- Name of the student who received the offer.
Company :- Name of the company that has offered the placement.
Join date :- The date on which the student is expected to join the company.
Offered Package :- The salary or compensation package offered to the student.
Period :- The duration of the training period (if any) the student will undergo in the company.
Note
Placement Offer records are created automatically when the Send Offer wizard is confirmed. They can also be created manually from this menu.
Campus Event
Go to .
Click on New to create a new Campus Event.

A Training Event toggle is available on each event form. When this is enabled, the event appears under Campus Events in the Placements menu and is filtered specifically for placement-related activities.
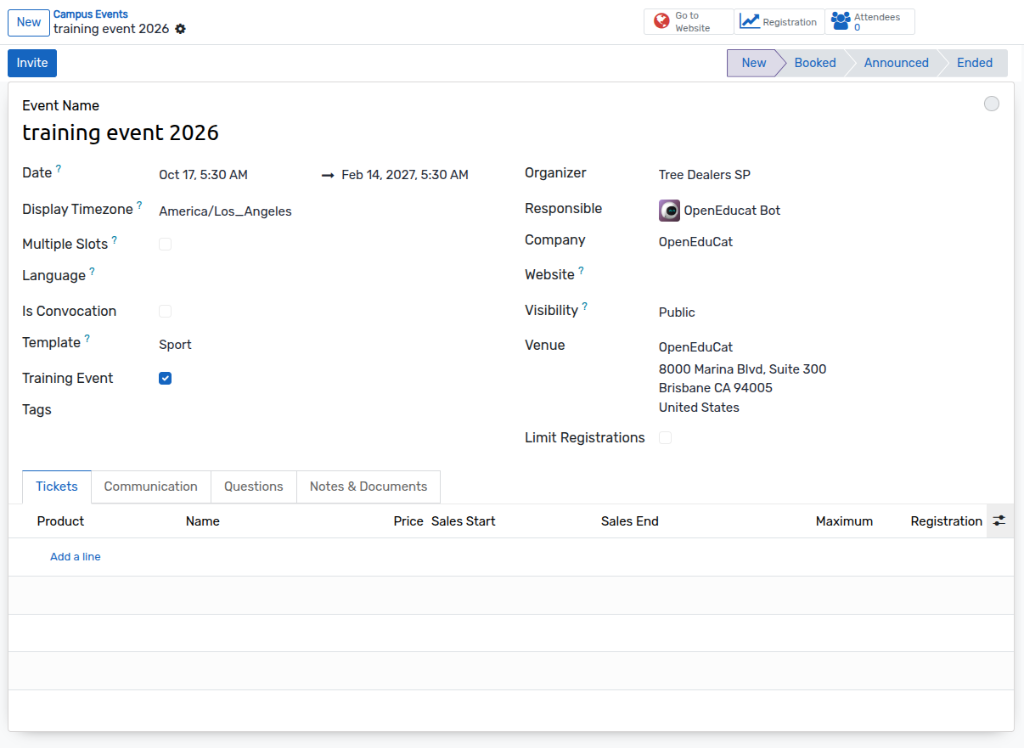
Once the event is published, it becomes visible under the Events section on the website. Users can then register for the event directly through the event page.

Once users register for an event, their details are shown under the Attendees smart button, as displayed in the image below.

Access Rights
The module supports the following user access levels:
User Group |
Permissions |
|---|---|
Back Office Administrator |
Full access: read, write, create, and delete on all placement records (Job Opportunities, Sessions, Offers). |
Faculty |
Read and write access on Job Opportunities and Recruitment Sessions; cannot delete. Can view the Send Offer wizard in read mode. |
Portal User |
Read-only access to published Job Opportunities (for website visibility). |
Multi-Company Support
The Job Opportunity model enforces multi-company record rules, ensuring that each user only sees announcements that belong to their company or its subsidiaries. The Company field on the Job Opportunity form is visible only in multi-company environments.
Email Notifications
The module includes an automated Student Offer Notification email template that is triggered when the Send Offer wizard is confirmed. The email includes:
Congratulations message addressed to the student by name.
Offering company name.
Joining date.
Offered package amount.
Training period and unit (Month/Year).
Next-steps checklist (review offer, submit acceptance, complete documentation, contact HR).