
Admin Side Configuration
OpenEduCat provides help to enhance the overall user system by providing options to send leave requests to different groups or sections of people.
Go to .
Click on New to create a new Leave Type.

Details of Leave Type
Code :- Set the unique code for leave type.
Name :- Set the name for the leave type.
How to admin can create leave for student
Go to .
Click on New to create a new Leave Request.
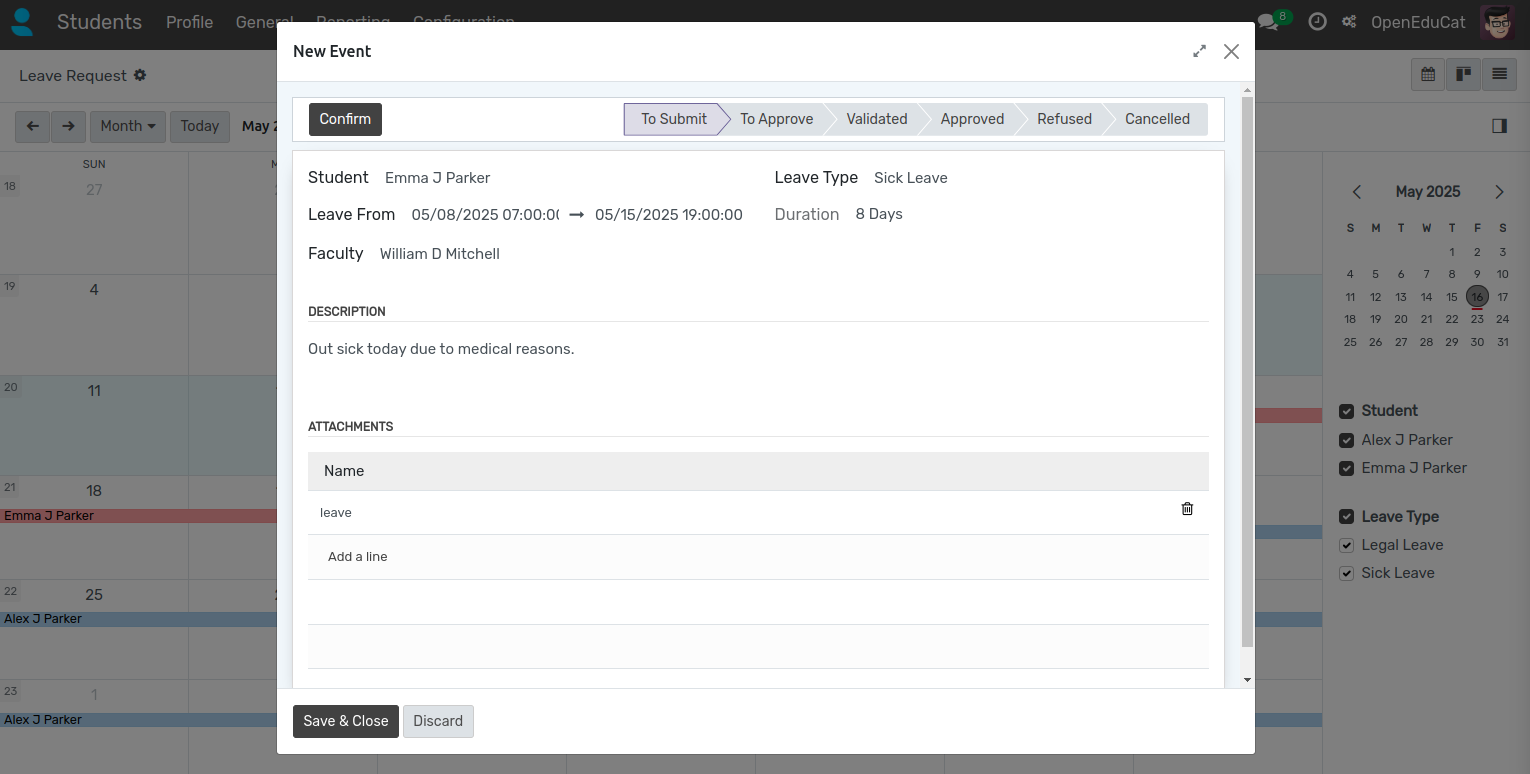
Student :- Select a student from drop down menu.
Leave Type :- Select Leave Type from dropdown menu. Required.
Description :- Write a description for leave request. Required.
Leave From :- Select start date to end date of leave. Both dates are required and the end date cannot be earlier than the start date.
Duration :- It will automatically compute based on selected date range.
Faculty :- Select faculty from drop down menu. Required.
Attachments :- Select attachments to upload.
Status of a Leave Request
A leave request moves through the following statuses, shown on the status bar at the top of the form :-
To Submit :- The request has been created but not submitted yet.
To Validate :- The request has been submitted and is waiting to be validated.
Validated :- The request has been validated and is waiting for final approval.
Approved :- The request has been approved.
Refused :- The request has been refused.
Cancelled :- The request has been cancelled.
Workflow of Student Leave Request
Admin and Faculties can Approve student’s leave requests.
Confirm
Click on Confirm to submit the request. This changes the state of record from To Submit to To Validate.
Validate
Click on Validate button to validate the request. This changes the state of record from To Validate to Validated.

Approve
Click on Approve button to approve the request. This changes the state of record from Validated to Approved.
Refuse
Click on Refuse to refuse the request. The button is available while the request is in To Validate, Validated or Approved, and changes the state to Refused.
Cancel
Click on Cancel button to cancel the request. The button is available while the request is in Validated or Approved, and changes the state to Cancelled.

Mark as Draft
Click on Mark as Draft to send a refused or cancelled request back to To Submit, so that it can be corrected and submitted again.
Note
Approving, refusing or cancelling a request stamps the record with the user who performed the action and the date on which it was performed. Both values are read-only.
Access Rights
The Student Leave Request menu is available to the Student Leave / User and Student Leave / Manager access groups, set on the user form under .